Successfully building your first app is one of the best feelings a software developer can ever have. I purpose to share the journey of how I made a login app using Firebase in Kotlin.

Introduction.
What is Firebase?
Firebase is a backend-as-a-service that gives developers a variety of tools and services to help them make high-quality apps, and grow their user base.
It's built on Google's infrastructure. Firebase enables a programmer to include user authentication such as sign-in using passwords, phone numbers, Google, Facebook, Twitter, and more.
The Firebase Authentication (SDK) can be used to manually add one or more sign-in methods into an app.
Building a login app.
To build a login app, one would require Firebase tools to set up the authentication of the user. Fortunately, this article provides a detailed step-by-step process for achieving this successfully.

Connecting the project with Firebase.
For the app's authentication, I included the basic user sign-in with an email address. Below are the steps to connect your project with firebase:
Create a new project in Android Studio.
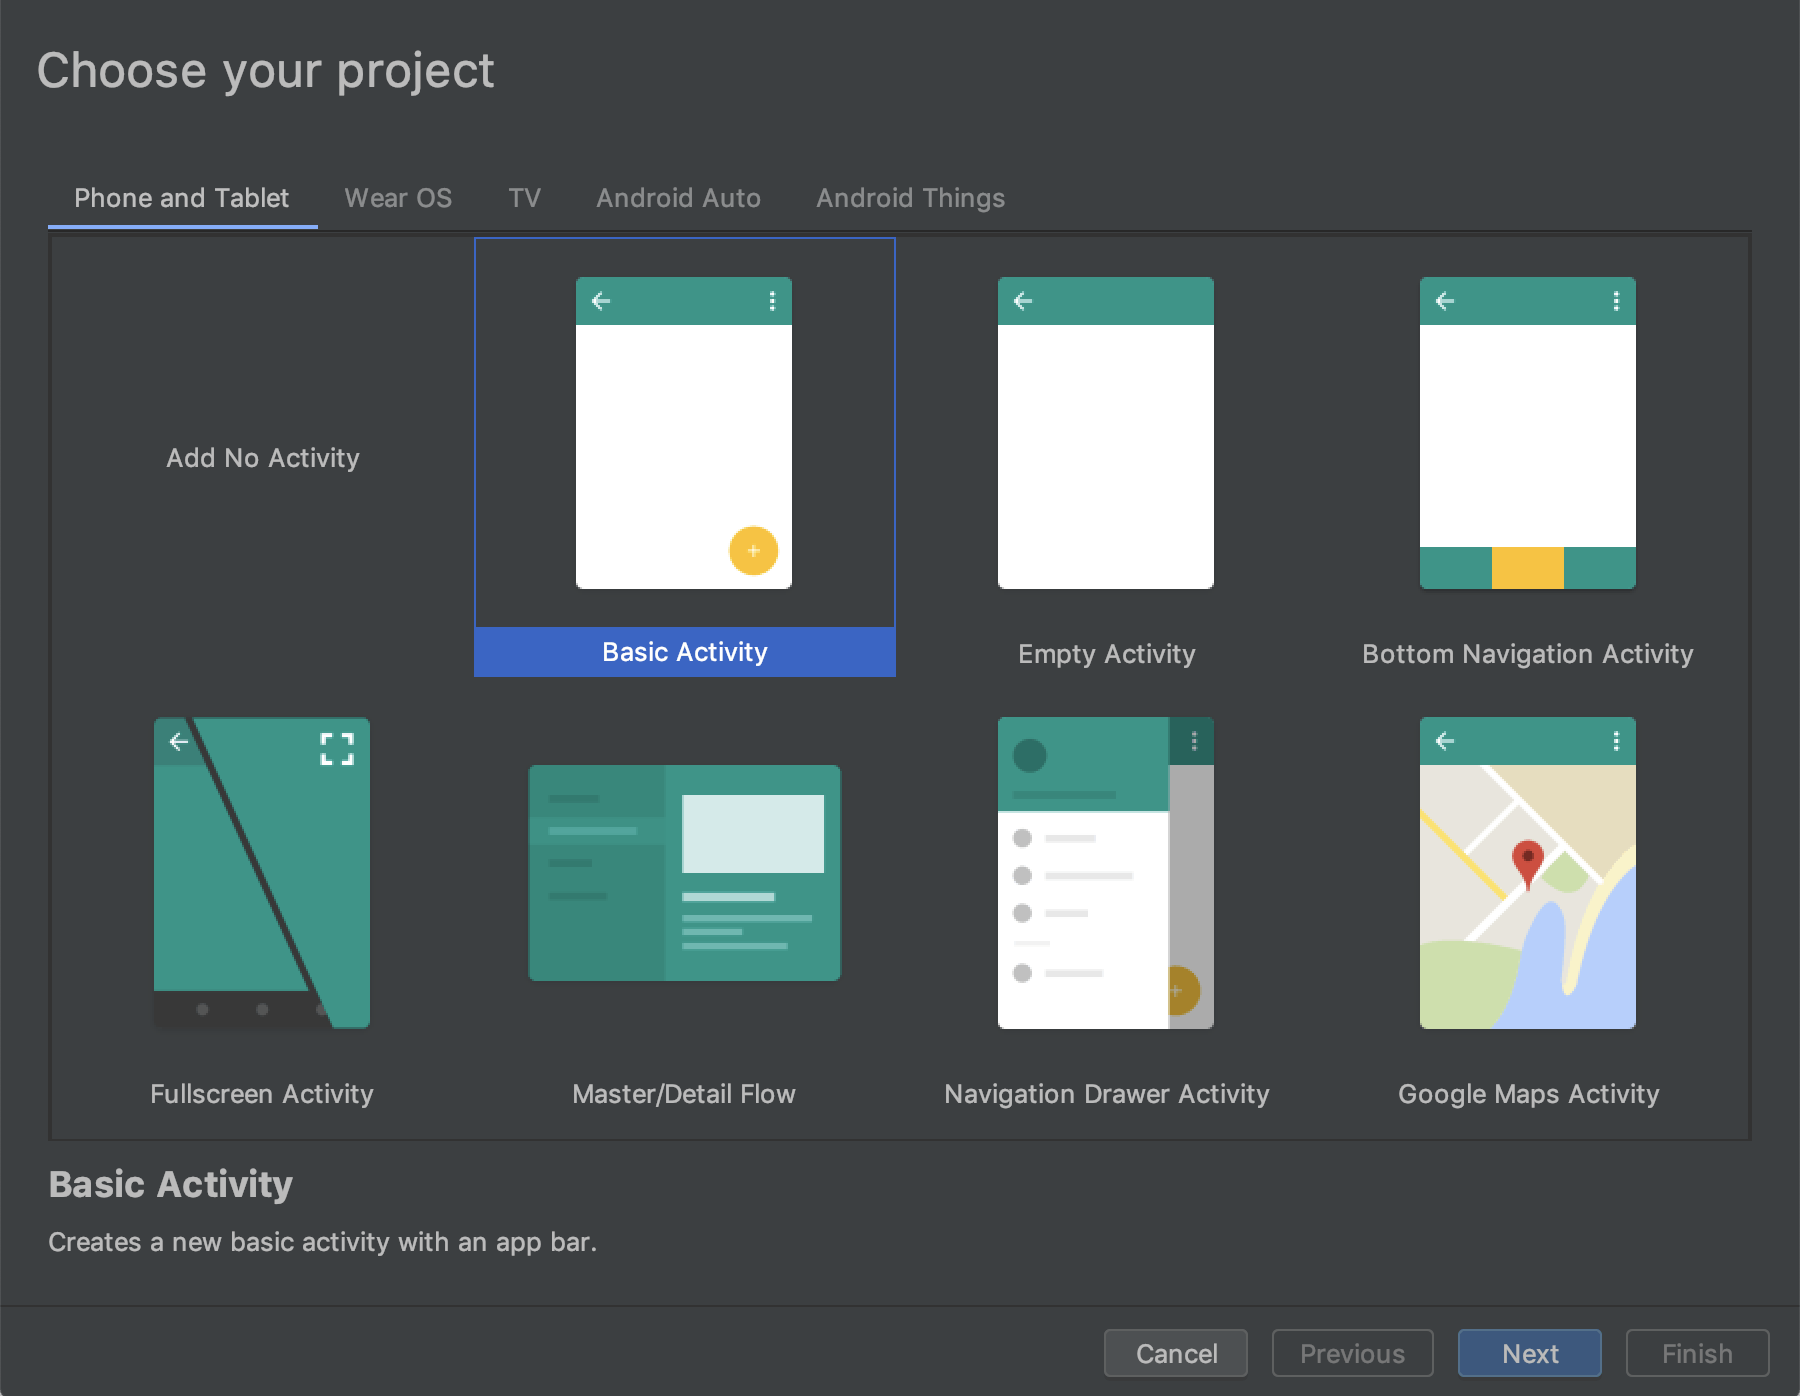
**Tip **: Android Studio has to be of the latest version. ie)equal or above the 2.2 version.
Click to download the latest Android Version
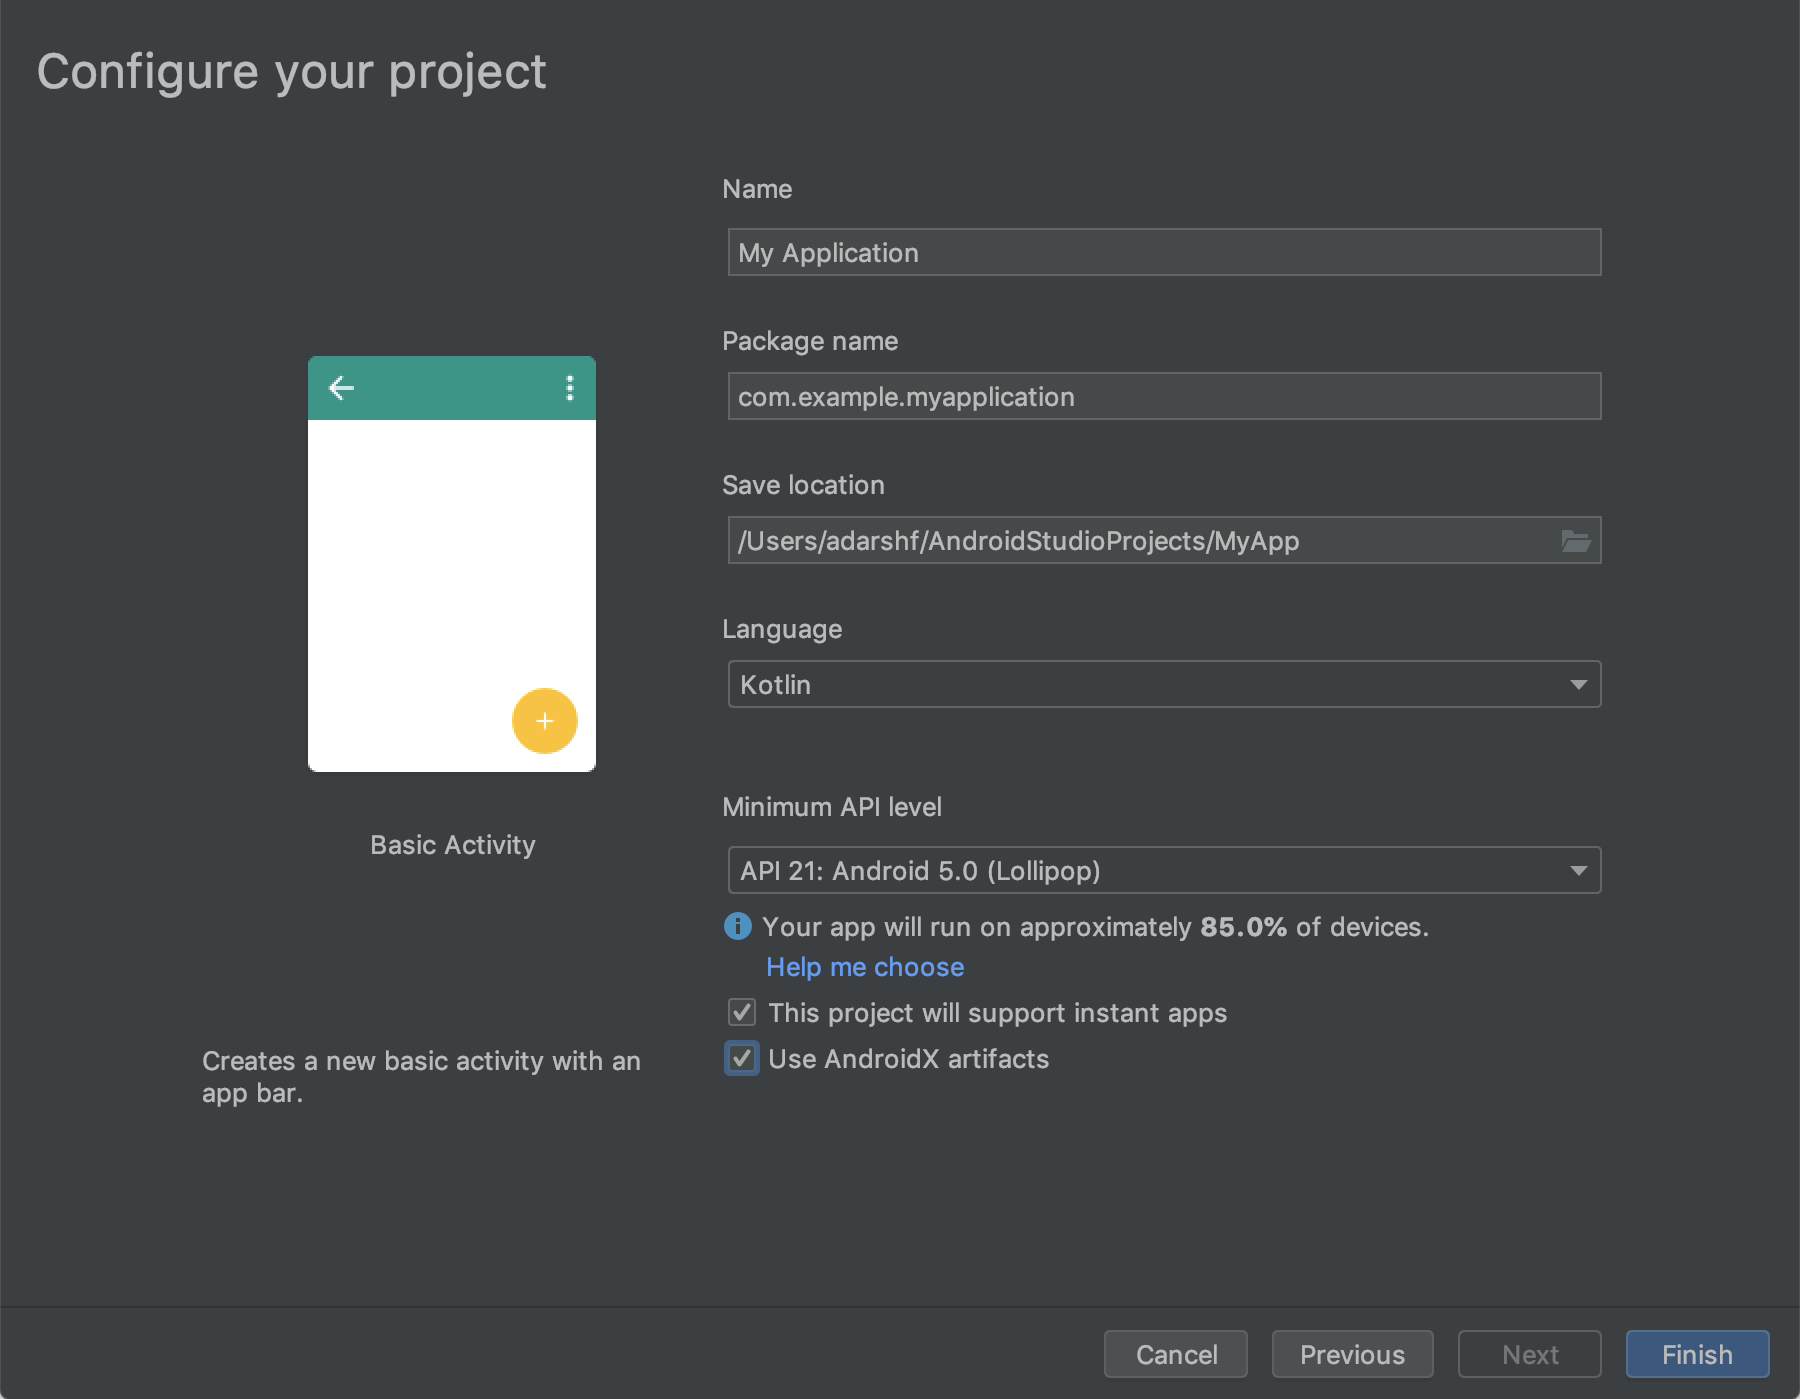
Configure the project created.
** Step 1)**
Indicate the **Name ** of your project.
** Step 2)**
The **Package Name ** will, by default be created by android studio from the **Name ** of your project.
** Step 3)**
On the Save location tab, choose where to** save** the project on your PC.
** Step 4)**
Choose your preferred language of code. For the app, we will be using Kotlin.
** Step 5)**
Specify the **Minimum API level ** to be supported by your app. I recommend a higher percentage API level ie) API 21: Android 5.0 (Lollipop)
** Step 6)**
Click on Finish to complete the setup of the project.
Adding Firebase to your project.
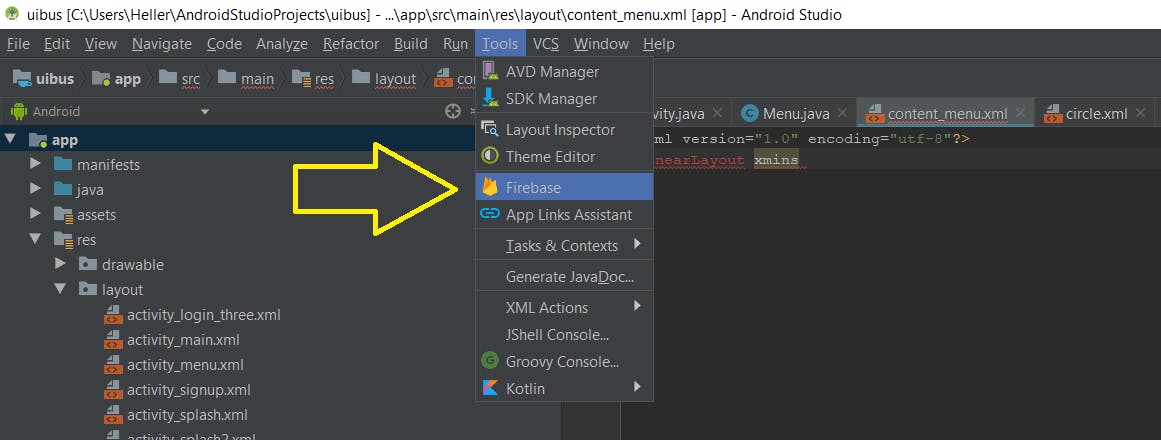
Step 1 )
On the **Tools bar ** in Android studio, click on Firebase on the drop-down menu.
Step 2 )
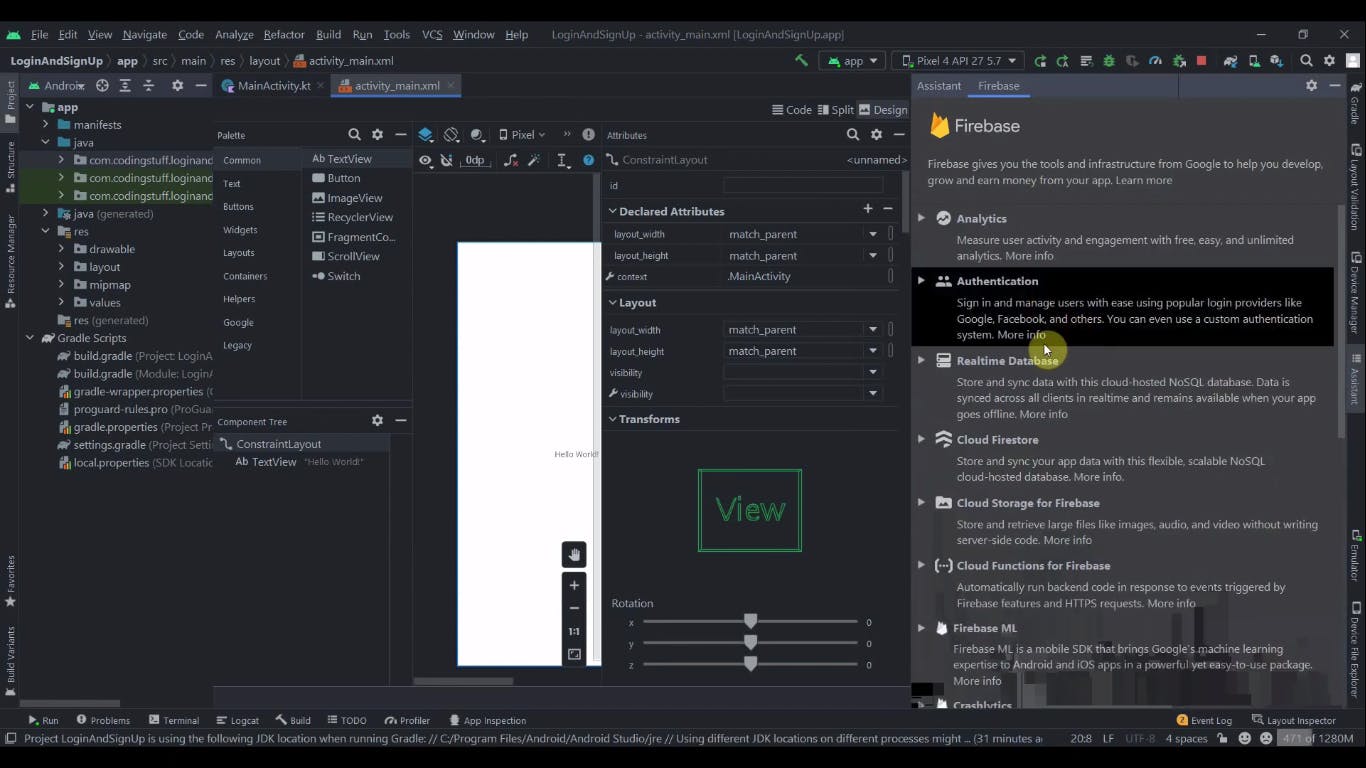
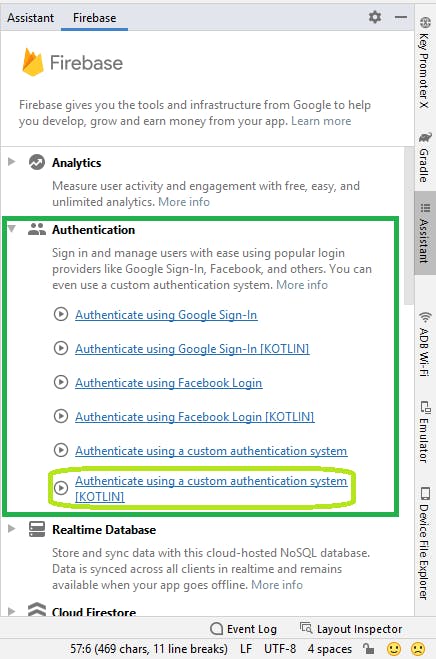
On the Firebase assistant menu, (located on the right side if the screen), click on the Authentication option.
Step 3 )
Select the ** Authenticate using a custom authentication system [KOTLIN]** option.
Step 4 )
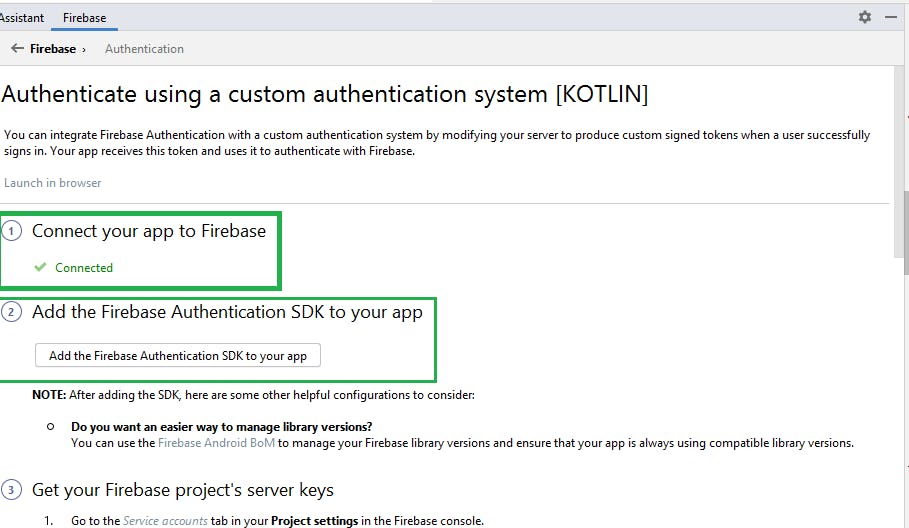
Once your app has been successfully connected with Firebase, click on the **Add the Firebase authentication SDK to your app ** option.
The Dependencies.
Project level build .gradle file.
After following the steps correctly, your project-level file will have the Firebase dependencies included in the code:
buildscript {
    repositories {
        google()
        mavenCentral()

    }
    dependencies {
        classpath "com.android.tools.build:gradle:7.0.4"
        classpath "org.jetbrains.kotlin:kotlin-gradle-plugin:1.6.21"
        classpath 'com.google.gms:google-services:4.3.13'

    }
}

task clean(type: Delete) {
    delete rootProject.buildDir
App-level build .gradle file.
On the app-level build.gradle file, add the following code:
  }
    buildFeatures{
        viewBinding= true
    }
Your app-level file will have the Firebase dependencies and plugins included in the file:
plugins {
    id 'com.android.application'
    id 'kotlin-android'
    id 'com.google.gms.google-services'
}

android {
    compileSdk 33

    defaultConfig {
        applicationId "com.example.first_app"
        minSdk 21
        targetSdk 33
        versionCode 1
        versionName "1.0"

        testInstrumentationRunner "androidx.test.runner.AndroidJUnitRunner"
    }

    buildTypes {
        release {
            minifyEnabled false
            proguardFiles getDefaultProguardFile('proguard-android-optimize.txt'), 'proguard-rules.pro'
        }
    }
    compileOptions {
        sourceCompatibility JavaVersion.VERSION_1_8
        targetCompatibility JavaVersion.VERSION_1_8
    }
    kotlinOptions {
        jvmTarget = '1.8'
    }
    buildFeatures{
        viewBinding= true
    }

}

dependencies {

    implementation 'androidx.core:core-ktx:1.9.0'
    implementation 'androidx.appcompat:appcompat:1.4.2'
    implementation 'com.google.android.material:material:1.6.1'
    implementation 'androidx.constraintlayout:constraintlayout:2.1.4'
    implementation 'com.android.support:support-annotations:28.0.0'
    implementation 'com.android.support:support-v4:28.0.0'
    testImplementation 'junit:junit:4.+'
    androidTestImplementation 'androidx.test.ext:junit:1.1.3'
    androidTestImplementation 'androidx.test.espresso:espresso-core:3.4.0'
    implementation platform('com.google.firebase:firebase-bom:30.2.0')
    implementation 'com.google.firebase:firebase-analytics-ktx'
}
Layouts for the App.
Use the activity_main.xml file as the **Login layout ** for the app.
For the Sign up layout , create a new xml layout by following these steps:
Step 1 )
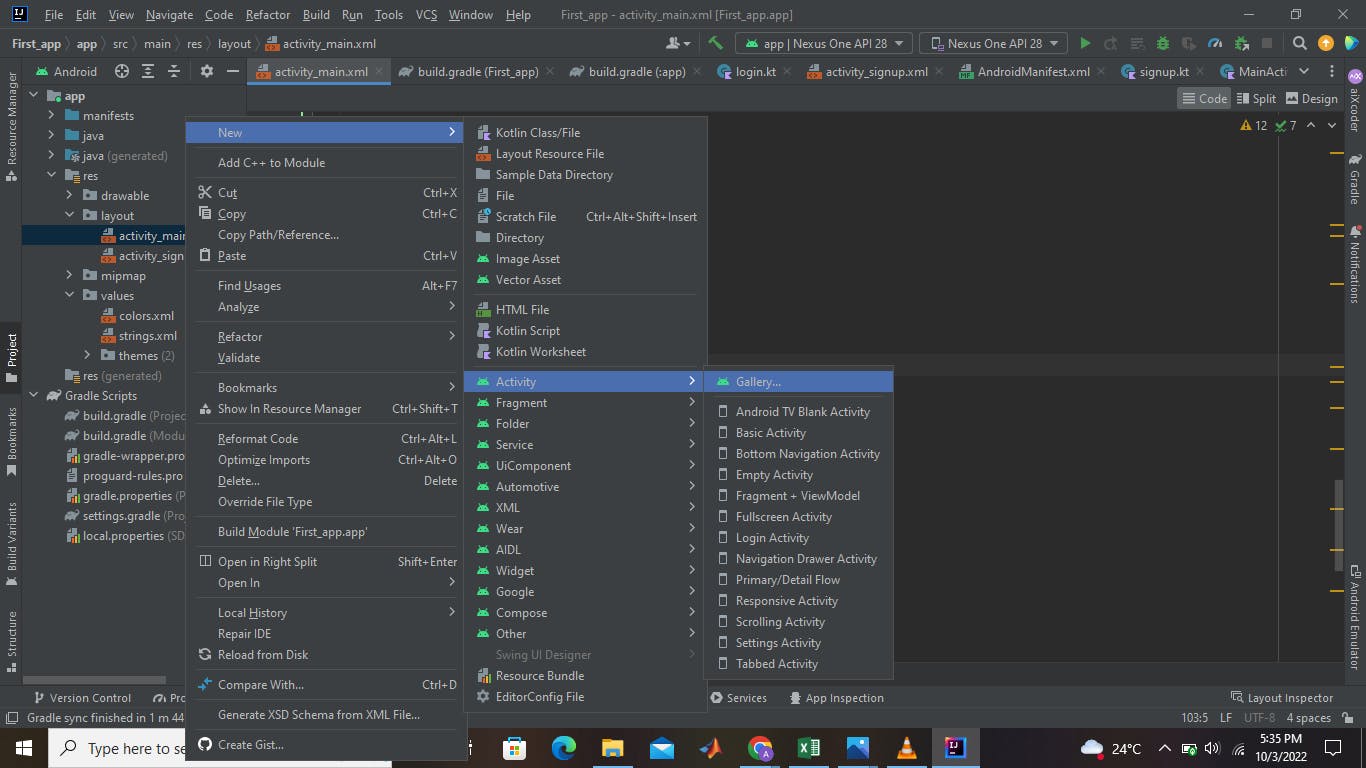
On the android app icon, right-click on the layout folder.
Step 2 )
Move your cursor to new activity then select the ** Gallery ** option.
Step 3 )
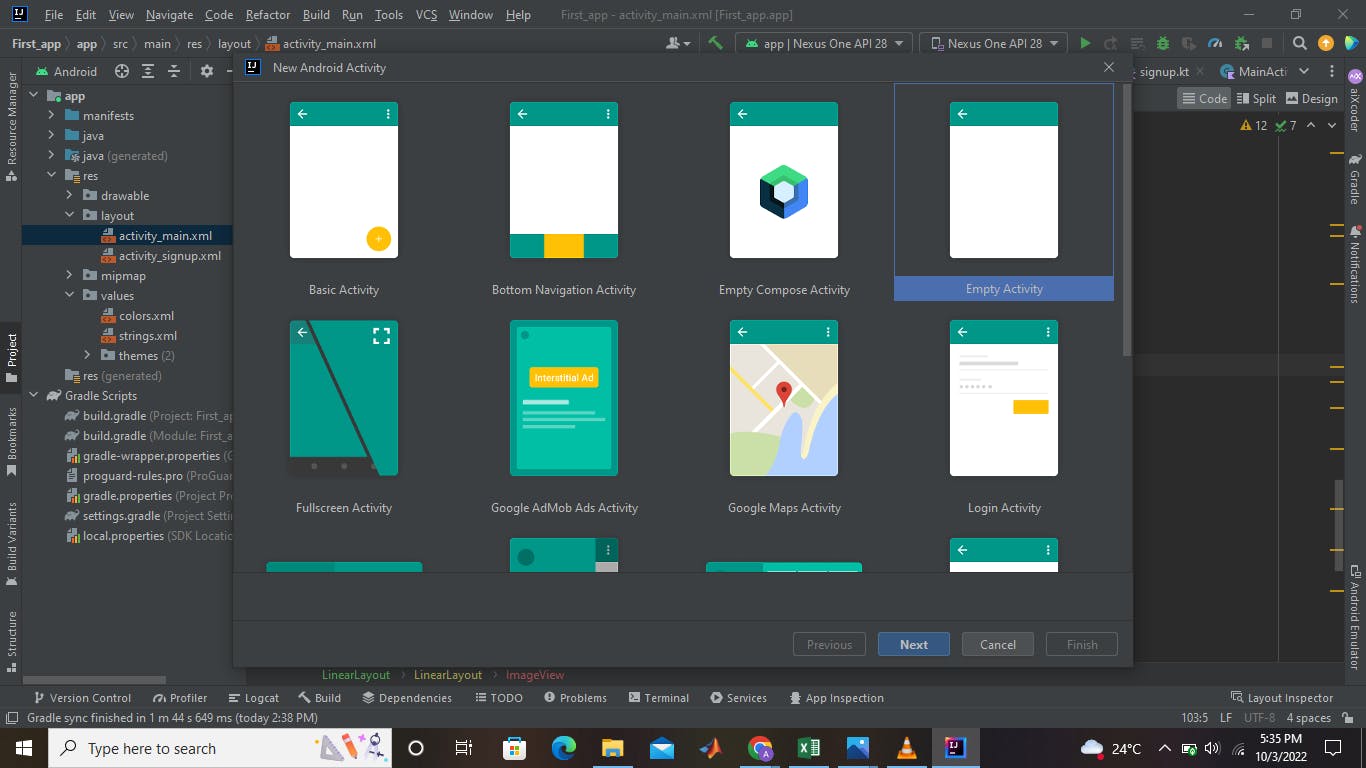
Select Empty Activity ** and click on ** Next.
Step 4 )
Indicate the Activity Name for the signup layout. In this case, we have used Sign_up.
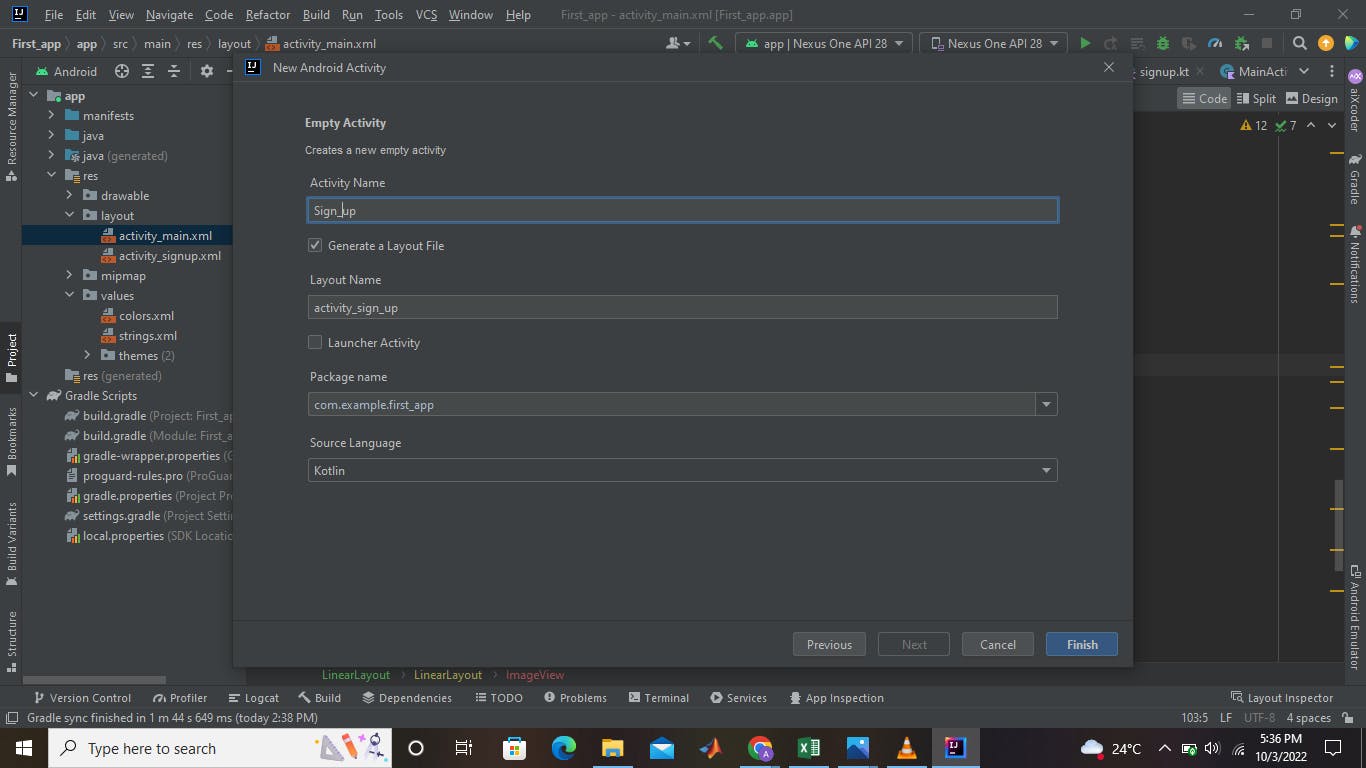
Creating the XML layout for the Registration Activity.
You can customize your layout to your specification.
One can use the following code:
<?xml version="1.0" encoding="utf-8"?>
<LinearLayout
        xmlns:android="http://schemas.android.com/apk/res/android"
        xmlns:tools="http://schemas.android.com/tools"
        xmlns:app="http://schemas.android.com/apk/res-auto"
        android:layout_width="match_parent"
        android:layout_height="match_parent"
        android:orientation="vertical"
        android:background="@drawable/bgcolor"

        tools:context=".MainActivity">


   <Button
            android:layout_width="match_parent"
            android:layout_height="wrap_content"
            android:text="Sign Up "
            android:id="@+id/signup"
             android:textColor="@color/white"
            android:textSize="30sp"
            android:textStyle="bold"
            android:layout_margin="30dp"
            android:gravity="center"
            android:backgroundTint="@color/bgcolor2"

            tools:ignore="HardcodedText"/>
    <EditText

            android:layout_width="match_parent"
            android:layout_height="wrap_content"
            android:id="@+id/username"
            android:hint="Username"
            android:textColorHint="@color/white"
            android:textColor="@color/white"
            android:layout_margin="10dp"
            android:padding="20dp"
            android:background="@color/edit_txtbg"
            android:drawableStart="@drawable/ic_baseline_person_24"
            tools:ignore="HardcodedText"/>
    <EditText


            android:layout_width="match_parent"
            android:layout_height="wrap_content"
            android:id="@+id/password"
            android:inputType="textPassword"
            android:hint="Password"
            android:textColorHint="@color/white"
            android:textColor="@color/white"
            android:layout_margin="10dp"
            android:padding="20dp"
            android:background="@color/edit_txtbg"
            android:drawableStart="@drawable/ic_baseline_info_24"
            tools:ignore="HardcodedText"/>

 <EditText


            android:layout_width="match_parent"
            android:layout_height="wrap_content"
            android:id="@+id/confpassword"
            android:inputType="textPassword"
            android:hint="Confirm Password"
            android:textColorHint="@color/white"
            android:textColor="@color/white"
            android:layout_margin="10dp"
            android:padding="20dp"
            android:background="@color/edit_txtbg"
            android:drawableStart="@drawable/ic_baseline_info_24"
            tools:ignore="HardcodedText"/>

        <TextView
            android:id="@+id/tvRedirectLogin"
            android:layout_width="match_parent"
            android:layout_height="wrap_content"
            android:gravity="center_horizontal"
            android:layout_margin="10dp"
            android:text="@string/already_have_an_account_login"
            android:textColor="#18206F"
            android:textSize="16sp" />

</LinearLayout>
Creating the XML layout for the Login activity.
You can design your layout to your specifications. The code for the log-in activity is as follows:
<LinearLayout
        xmlns:android="http://schemas.android.com/apk/res/android"
        xmlns:tools="http://schemas.android.com/tools"
        xmlns:app="http://schemas.android.com/apk/res-auto"
        android:layout_width="match_parent"
        android:layout_height="match_parent"
        android:orientation="vertical"
        android:background="@drawable/bgcolor"

        tools:context=".MainActivity">

<Button

            android:layout_width="wrap_content"
            android:layout_height="wrap_content"
            android:id="@+id/login"
            android:text="LOGIN"
            android:layout_gravity="center"
            android:layout_margin="20dp"
            android:textSize="20sp"
            android:backgroundTint="@color/bgcolor"/>
 <EditText

            android:layout_width="match_parent"
            android:layout_height="wrap_content"
            android:id="@+id/username"
            android:hint="Username"
            android:textColorHint="@color/white"
            android:textColor="@color/white"
            android:layout_margin="10dp"
            android:padding="20dp"
            android:background="@color/edit_txtbg"
            android:drawableStart="@drawable/ic_baseline_person_24"
            tools:ignore="HardcodedText"/>
    <EditText


            android:layout_width="match_parent"
            android:layout_height="wrap_content"
            android:id="@+id/password"
            android:inputType="textPassword"
            android:hint="Password"
            android:textColorHint="@color/white"
            android:textColor="@color/white"
            android:layout_margin="10dp"
            android:padding="20dp"
            android:background="@color/edit_txtbg"
            android:drawableStart="@drawable/ic_baseline_info_24"
            tools:ignore="HardcodedText"/>
  <TextView
            android:id="@+id/tvRedirectSignUp"
            android:layout_width="match_parent"
            android:layout_height="wrap_content"
            android:layout_margin="15dp"
            android:gravity="center_horizontal"
            android:text="@string/don_t_have_an_account_sign_in"
            android:textColor="#18206F"
            android:textSize="16sp" />

</LinearLayout>
Creating code for the Registration Activity.
Here is the code that will enable the user to **Sign up ** for the app.
package com.example.first_app

import android.content.Intent
import androidx.appcompat.app.AppCompatActivity
import android.os.Bundle
import android.widget.Button
import android.widget.EditText
import android.widget.TextView
import android.widget.Toast
import com.example.first_app
import com.google.firebase.auth.FirebaseAuth
import com.google.firebase.auth.ktx.auth
import com.google.firebase.ktx.Firebase

class SignUpActivity : AppCompatActivity() {
    lateinit var Email: EditText
    lateinit var ConfPass: EditText
    private lateinit var Pass: EditText
    private lateinit var btnSignUp: Button
    lateinit var tvRedirectLogin: TextView

    // create Firebase authentication object
    private lateinit var auth: FirebaseAuth


    override fun onCreate(savedInstanceState: Bundle?) {

        super.onCreate(savedInstanceState)
        setContentView(R.layout.activity_sign_up)

        // View Bindings
        Email = findViewById(R.id.username)
        ConfPass = findViewById(R.id.confpassword)
        Pass = findViewById(R.id.password)
        btnSignUp = findViewById(R.id.signup)
        tvRedirectLogin = findViewById(R.id.tvRedirectLogin)

        // Initialising auth object
        auth = Firebase.auth

        btnSignUp.setOnClickListener {
            signUpUser()
        }

        // switching from signUp Activity to Login Activity
        tvRedirectLogin.setOnClickListener {
            val intent = Intent(this, LoginActivity::class.java)
            startActivity(intent)
        }

    }

    private fun signUpUser() {
        val email = Email.text.toString()
        val pass = Pass.text.toString()
        val confirmPassword = ConfPass.text.toString()

        // check pass
        if (email.isBlank() || pass.isBlank() || confirmPassword.isBlank()) {
            Toast.makeText(this, "Email and Password can't be blank", Toast.LENGTH_SHORT).show()
            return
        }

        if (pass != confirmPassword) {
            Toast.makeText(this, "Password and Confirm Password do not match", Toast.LENGTH_SHORT)
                .show()
            return
        }
        // If all credential are correct
        // We call createUserWithEmailAndPassword
        .
        auth.createUserWithEmailAndPassword(email, pass).addOnCompleteListener(this) {
            if (it.isSuccessful) {
                Toast.makeText(this, "Successfully Singed Up", Toast.LENGTH_SHORT).show()
                finish()
            } else {
                Toast.makeText(this, "Singed Up Failed!", Toast.LENGTH_SHORT).show()
            }
        }
    }
}
Creating code for the Login activity.
Here is the code that will enable the user to **Login ** after signing up for the app:
package com.example.first_app
import android.content.Intent
import androidx.appcompat.app.AppCompatActivity
import android.os.Bundle
import android.widget.Button
import android.widget.EditText
import android.widget.TextView
import android.widget.Toast
import com.example.first_ap
import com.google.firebase.auth.FirebaseAuth

class LoginActivity : AppCompatActivity() {

    private lateinit var tvRedirectSignUp: TextView
    lateinit var Email: EditText
    private lateinit var Pass: EditText
    lateinit var btnLogin: Button

    // Creating firebaseAuth object
    lateinit var auth: FirebaseAuth

    override fun onCreate(savedInstanceState: Bundle?) {
        super.onCreate(savedInstanceState)
        setContentView(R.layout.activity_login)

          // View Binding
        tvRedirectSignUp = findViewById(R.id.tvRedirectSignUp)
        btnLogin = findViewById(R.id.login)
        Email = findViewById(R.id.username)
        Pass = findViewById(R.id.password)

          //initializing Firebase auth object
        auth = FirebaseAuth.getInstance()

        btnLogin.setOnClickListener {
            login()
        }

        tvRedirectSignUp.setOnClickListener {
            val intent = Intent(this, SignUpActivity::class.java)
            startActivity(intent)
            // using finish() to end the activity
            finish()
        }
    }

    private fun login() {
        val email = Email.text.toString()
        val pass = Pass.text.toString()
        // calling signInWithEmailAndPassword(email, pass)
          // function using Firebase auth object
        // On successful response Display a Toast
        auth.signInWithEmailAndPassword(email, pass).addOnCompleteListener(this) {
            if (it.isSuccessful) {
                Toast.makeText(this, "Successfully LoggedIn", Toast.LENGTH_SHORT).show()
            } else
                Toast.makeText(this, "Log In failed ", Toast.LENGTH_SHORT).show()
        }
    }

}
Bonus
For a better choice of colors to use in the XML layout, you can follow these steps:
** Step 1 )**
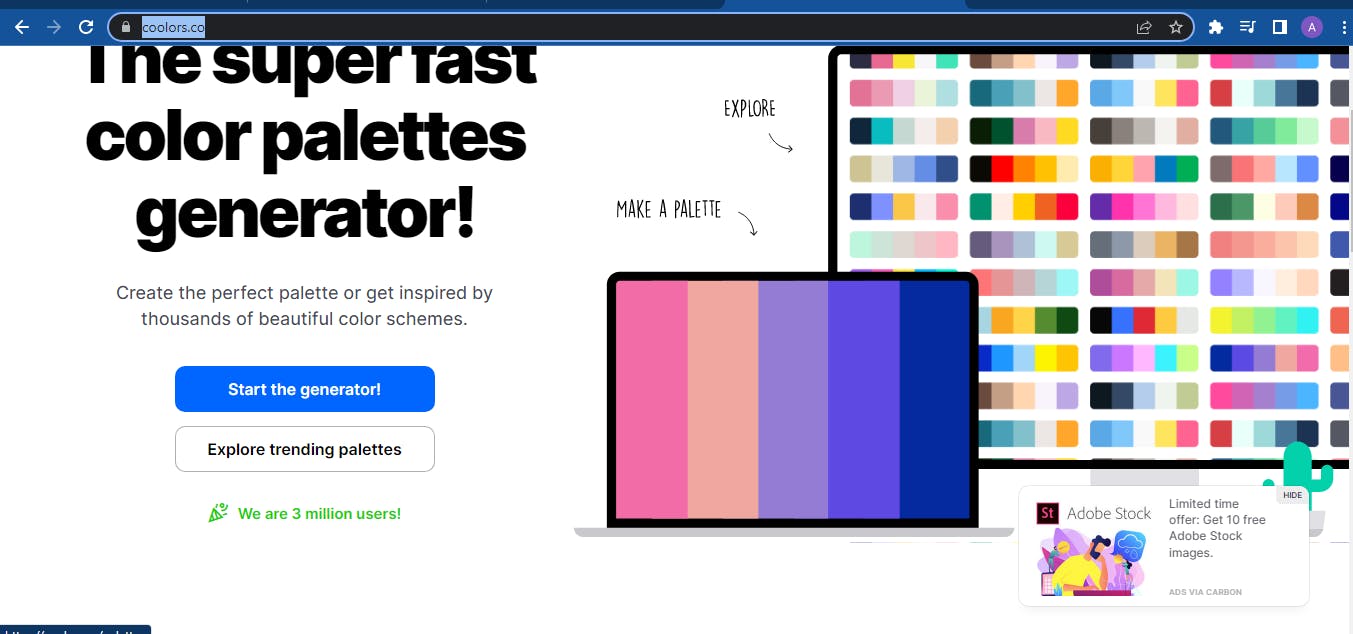
Go to Coolors.co
** Step 2 )**
Click on Explore trending palettes to find the color of your choice.
** Step 3 )**
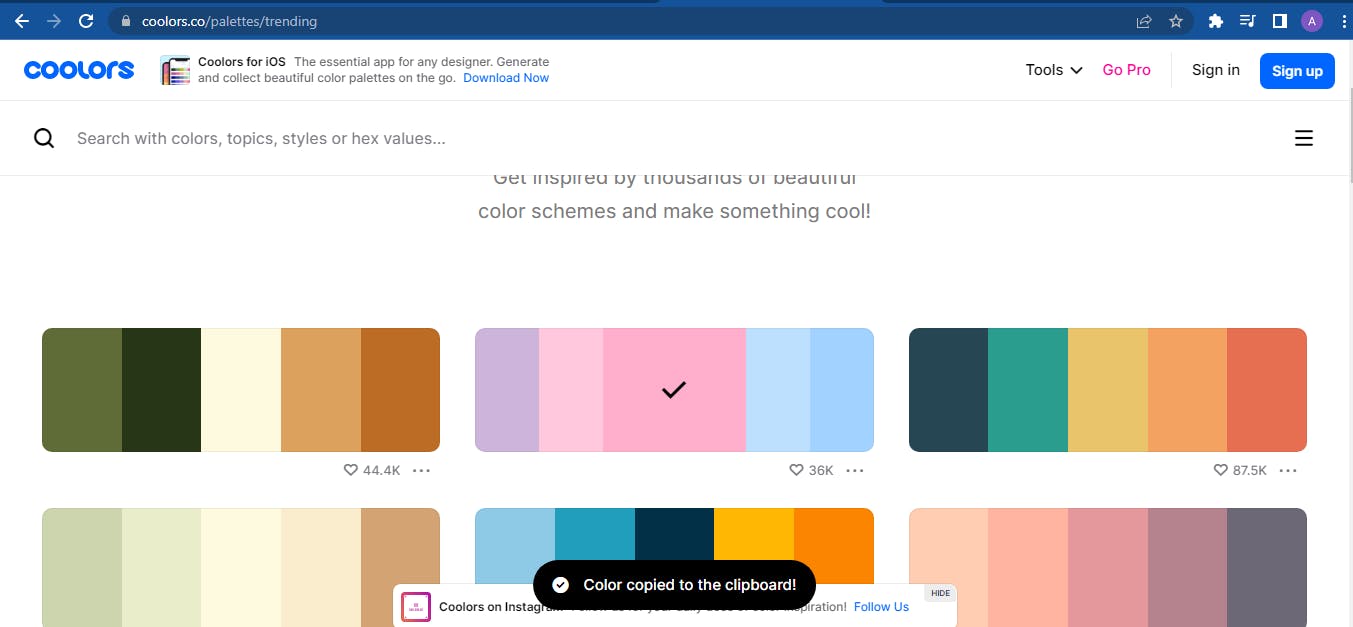
Click on the ** Hex value ** to pick the color of your choice.
** Step 4 )**
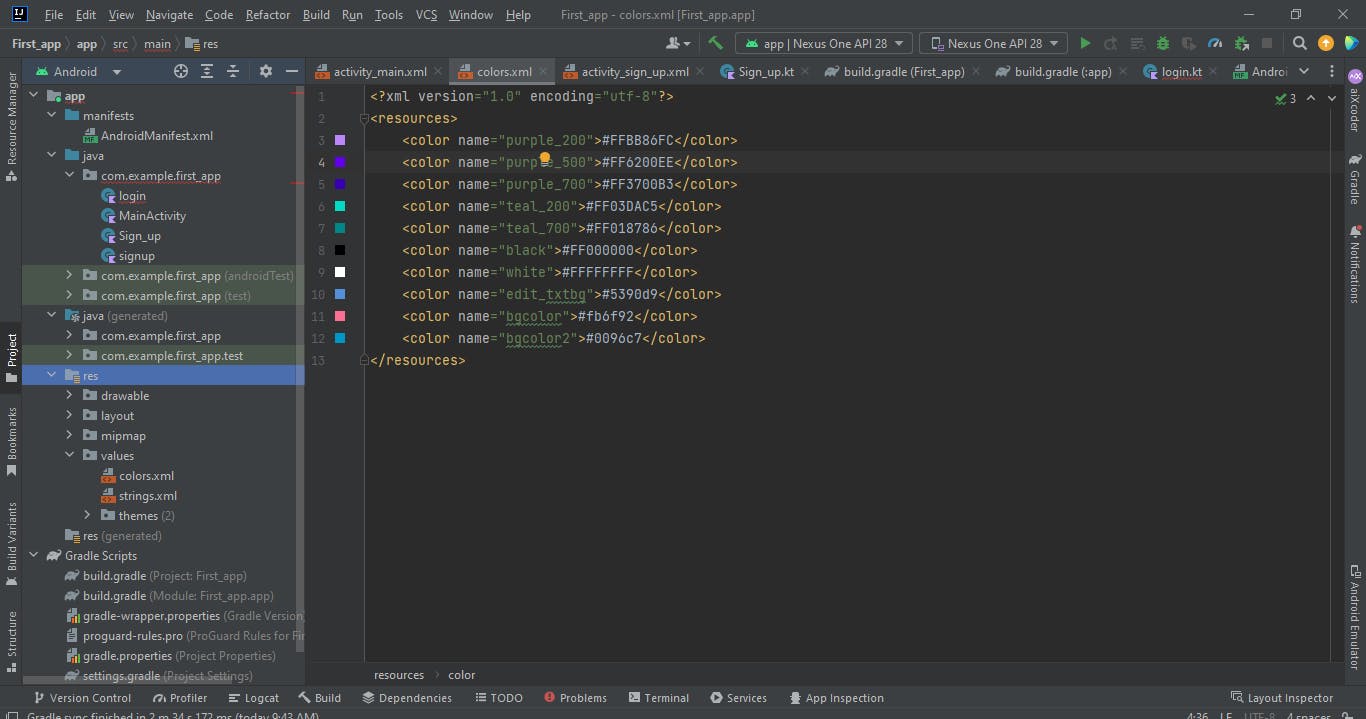
Click on the res/values/colors.xml to access the colors.xml file in your android app project.
** Step 5 )**
Using the following code, **name ** and paste the **hex value ** of your color:
<color name="color">#hexvalue</color>
**Step 6 ) **
Access the color in the XML layout file by its ** name **. ie)
android:backgroundTint="@color/bgcolor2"
I hope this article helps. Happy coding!!

